Crab Stitch How To

I love the crab st, I do not use it enough. It is especially handy on boys outfits, where you want to finish it off but don’t want too fancy an edging

So here is my how to guide— here for free pdf

You start the row/ round of with a 1ch / ch1 and normal dc/sc

1


Then put your hook through previous st

2


Turn hook to left

3


Put the hook over yarn and catch it, pull it through stitch

4

5


Yarn over hook and pull through 2 loops6


Pull tight

7


Crab st made

8


Hope you like our wee how to guide

If you want to download the pdf file- do so here  *

Until next time

Fiona x


Invisible 3ch /ch3 tutorial

I am writing this tutorial to help make a neater edge for our matinee jackets or any row really where you need to start with a 3ch (UK) / ch3 (USA)

If you wish to download a pdf version to keep pleaseclick here *

1. The first photo shows the original 3ch /ch3 and how it looks at the start of the row, it is out of place, leaves a gap and when you want to add on an edging or band to it, it is difficult to put your hook through.

2.The second photo shows the “invisible ” version, which as you can see is much neater and allows you to put your hook through for bands etc

—————————————————————————————————–

I started with a base row of dc/ sc for this example

—————————————————————————————————–

Make 1ch/ch1 and pull it tight, if you don’t it will cause a slight bulge

—————————————————————————————————–

Make 1dc / 1sc by hook through st, yarn over hook and pull through to make 2 loops

yarn over hook and pull through to complete dc/ sc

—————————————————————————————————–

The put the hook in between the two loops- i have take 3 photos to show you where

—————————————————————————————————–

Yarn over the hook and pull through

—————————————————————————————————–

I always think of this as 2 dc’s/ sc’s stacked on top of one another

—————————————————————————————————–

Yarn over hook and pull through to finish

—————————————————————————————————–

“invisible” 3ch / ch3 made 🙂

—————————————————————————————————–

This is where you put the hook through to work down the side of the row- for example when you are adding and edging or button bands

I do hope my little tutorial helps

If you wish to download a pdf version to keep please clickhere *

Until next time

Fiona x

*this is an affiliate link to craftsy

****Throwback Thursday****

This weeks throwback Thursday is crochet pattern #154 

It is slightly different as it has been revised twice!

it comes in 3 sizes Preemie, 0-3mths, 3-6mths

and it is made in UK-DK, USA-Light Worsted (3), AU-8ply

This was the original version back in 2010, I was going for an 80’s styling with the black contrast

Not sure what I was thinking, the ribbed cardigan looks a bit strange in this colouring!!

This was the first revision in 2012, i removed the shoulder ruffles, the second bottom ruffle and added flowers to the little girls one and changed the colour of the boys. I think it is much better

When Sarah came along we decided to redo it and get clearer photos

Doesn’t our wee model look gorgeous in it ? I may be biased though lol

As always this pattern will be £1 for a week

Until next time

Fiona x

View the pattern here

****Throwback Thursday****

Hello everyone,

I did say I would be adding more post and I am glad that I have managed it so far!!

My 2 little munchkins have been sick and so everything gets put aside for comfort and cuddles.

Now they are on the mend here is this weeks throwback Thursday (our third)

This week I want to highlight another one of mum’s knitting patterns.

A matching hat and blanket pattern which has been made in UK-Aran, USA- Worsted and perfect for the cold weather we are having just now

I cannot believe this pattern was originally published in 2010 !! It certainly does not seem that long ago.

Designed in 4 sizes 0-3, 3-6, 6-9, 9-12, 12-24 months which could be made in complementing colours to match little jackets or a pram / buggy

mmmm so warm and cosy 🙂

until next time

Fiona x

View the pattern here

Yarn Review- Knitcraft Cotton Blend Plain

I picked out this yarn to remake pattern 87 and I thought I would do a review on it

Knitcraft Cotton Blend Plain by hobbycraft

(light pink)

First it is double knitting (light worsted) yarn and they suggest using UK-5mm, USA-H crochet hook or UK-4mm, USA-6 knitting needles

It is 50% acrylic 50% cotton and comes in 16 shades- 2 are mixes

At £3.30 for a 100g ball it is fairly cheap.

Looking at the yarn in the ball it look lovely and even and soft

PRO’s

  • Fairly cheaply priced
  • Doesnt seem to tangle
  • Soft yet sturdy feeling

CON’s

  • Feels thicker than I would expect from a double knitting yarn, I would not normally use a 5mm hook for a DK yarn
  • Hand wash, no tumble dry and cool iron, do not make it a parents friend
  • I am a very tight even crocheter, but I could not get this even. Even when I get to the end of a row and think it went well there will still be some pulled stitches (please see photo below)
  • Splits when crocheting which can be very annoying

In conclusion I have to say I am not a huge fan of this yarn. If it wasn’t for the splitting and weird stitches (see above) it would be quite good for amigurami or toys, possibly good for scrubbing cloths /potholders as it feels quite thick and sturdy. I won’t be picking this up to use again.

Until next time

Fiona x

Free Baby Mittens Knitting Pattern

untitled-3-.jpg

With having 3 children myself, 3 grandchildren and more on the way, i know how useful mittens are so I decided to create this simple little knitting pattern for baby mitts
It is made in UK- DK, USA- light worsted, AU-8ply and is for 0-3 months

PDF version to download– http://shrsl.com/rvm2

0-3mths

Requirements

20g/3/4 oz

UK Double knitting, USA light worsted (3), AU 8ply

Knitting needles

UK 3.25mm, USA 3

40” (101cm) of ¼” (0.5cm) ribbon

Or

4mm/F crochet hook if making a cord

Tension/gauge; using above yarn and needles, 12sts x 16 rows over st st = 2” (2.5cm) square

Abbreviations: k-knit, p-purl, k2tog-knit 2 stitches together, k2togtbl-knit 2 stitches together through back loop, st st-stocking/stockinette stitch

Mitts

Using main cast on 32sts

Row 1: * k1, p1, rep from * to end

Rep first row 10 more times

Ribbon row: k2, * yon, k2tog, k3, rep from * to end

Work 17 rows st st starting with a purl row

Next row: k1, k2togtbl, k10, k2tog, k2, k2togtbl, k10, k2tog, k1 (28sts)

Next row: purl

Next row:k1, k2togtbl, k8, k2tog, k2, k2togtbl, k8, k2tog, k1 (24sts)

Next row: purl

Cast/bind off

To make cord if not using ribbon

Ch 90, fasten of yarn

I sewed the ends into the chain

Make up/complete

Sew up seams, sew in all threads, cut the 40” (101cm) of ¼” (0.5cm) ribbon in half and thread through each mitt, make sure to secure it in place with a few stitches

PDF version to download– http://shrsl.com/rvm2

Until next time

Shirley x

*there is an affiliate link on this page

​****Throwback Thursday****

Good morning to everyone.
Before our Owl Cocoon pattern became so popular, this was our most popular cocoon.

It was originally released in 2009, cant believe how long this pattern has been out

The Ruffled Cocoon Crochet Pattern 127

Although a bit time consuming doing the ruffles, it is an easy pattern.

I think the time put in to make it is worth it 🙂
It is made in UK-Aran, USA-Worsted, AU-12ply and was only designed in one size 0-3 months

I always loved the look of this cocoon and made a sleeping bag pattern to match it.

It will be on special offer for 1 week  —- £1

Until next time

Fiona x

First Yarn Review- Caron Simply Soft

I thought i might start doing some yarn reviews so that you can see which yarns we use.

My first review is on a newly discovered yarn

Caron Simply Soft

(Chartreuse, Country Blue & Orchid)

It is a worsted (aran) weighted yarn and they suggest using a UK-5mm, USA-H crochet hook or UK-5mm, USA-8 knitting needles

It is 100% acrylic and comes in 52 lovely shades

Under $5 / £5 so not the cheapest or the most expensive yarn out there

I first discovered this yarn when i spotted a beautiful hat mum had made, I knew then i had to get me some and try it out!!

I decided on the Chartreuse- a beautiful lime green colour

and with this i made

PRO’s

  • It comes in a lot of colours
  • This yarn is so soft, making it a good choice for baby wear
  • Being machine washable and dryable makes it very versatile and parent friendly
  • Glides easily over your hook
  • Has a fuzzy natural look to the yarn
  • So far i have not come across any knotting in the yarn (where the yarn has stopped and they have rejoined it with a knot- one of the most annoying things to come across- I don’t like knots in my work, so I usually have to then cut and sew in ends) so that is definitely a plus point
  • It is readily available in the UK and USA which is a plus point for me when designing

CON’s

  • Tends to get tangled at the start, so you have to sort it out with multiple hands (this wastes precious crochet time)
  • The threads can split apart which can be annoying, if you have keep a tight tension on the yarn it makes it more likely to happen as you insert your hook, so keeping it slightly looser can help
  • It is thinner than other worsted (aran) weighted yarns I have used, but keeping an eye on your tension helps solves this
  • I had to google to find out what was the dye lot number on the label as it isn’t immediately obvious (it is the ww number)

In conclusion I have to say I like this yarn a lot. I love the soft sheen and the colours it comes in and I am working on another project with it at the moment and will definitely be using it again

Until next time

Fiona x

Crocodile Stitch Tutorial (UK & USA Terminology)

There are many ways of doing the crocodile st and I think this is the easiest. I may do further versions in the future, so this shall be version 1 and is used in pattern 299.

So to start there should be a multiple of 10 plus 1ch to start (ie 21, 31, 41 ch)

USA-Row 1: 1dc into ch-5 from hook (the 4ch acts as 1tr, 1ch), * ch2, miss 3sts, (1tr, 1ch, 1tr) into next st, rep from * to end, turn

UK-Row 1: 1tr into 5th ch from hook (the 4ch acts as 1tr, 1ch), * 2ch, miss 3sts, (1tr, 1ch, 1tr) into next st, rep from * to end, turn

USA-Row 2: ch1, 5fpdc into last dc of previous row, (working from top to bottom of dc), ch1, 5fpdc into next dc (working from bottom to top of dc), * sk ch-2, sl.st into next ch1-sp, sk ch-2, 5fpdc into next dc (working from top to bottom of dc), ch1, 5fpdc into next dc (working from bottom to top of dc), rep from * to end, turn (3 scales)

UK-Row 2: 1ch, 5fptr into last tr of previous row, (working from top to bottom of tr), 1ch, 5fptr into next tr (working from bottom to top of tr), * miss 2ch, sl.st into next 1ch.sp, miss 2ch, 5fptr into next tr (working from top to bottom of tr), 1ch, 5fptr into next tr (working from bottom to top of tr), rep from * to end, turn (3 scales)

USA- Row 3: ch1, sl.st into the middle of the scale, ch4 (counts as 1dc, ch-1), 1dc into base of ch-4, * ch2, (1dc, ch1, 1dc) in between scales (into same place as sl.st from previous row), ch2, (1dc, ch1, 1dc) into middle of scale, rep from * to end, turn

UK- Row 3: 1ch, sl.st into the middle of the scale, 4ch (counts as 1tr, 1ch), 1tr into base of 4ch, * 2ch, (1tr, 1ch, 1tr) in between scales (into same place as sl.st from previous row), 2ch, (1tr, 1ch, 1tr) into middle of scale, rep from * to end, turn

USA- Row 4: ch1, sl.st into ch1-sp, * sk ch-2, 5fpdc into next dc (working from top to bottom of dc), ch1, 5fpdc into next dc (working from bottom to top of dc), sk ch-2, sl.st into next ch1-sp, rep from * to end, turn

UK- Row 4: 1ch, sl.st into 1ch.sp, * miss 2ch, 5fptr into next tr (working from top to bottom of tr), 1ch, 5fptr into next tr (working from bottom to top of tr), miss 2ch, sl.st into next 1ch.sp, rep from * to end, turn

USA-Row 5: ch1, sl.st (into same place as sl.st from previous row), ch4 (counts as 1dc, ch-1), 1dc into base of ch-4, * ch2, (1dc, ch1, 1dc) into middle of scale, ch2, (1dc, ch1, 1dc) in between scales (into same place as sl.st), rep from * to end, turn

UK- Row 5: 1ch, sl.st (into same place as sl.st from previous row), 4ch (counts as 1tr, 1ch), 1tr into base of 4ch, * 2ch, (1tr, 1ch, 1tr) into middle of scale, 2ch, (1tr, 1ch, 1tr) in between scales (into same place as sl.st), rep from * to end, turn

USA-Row 6: ch1, 5fpdc into last dc of previous row, (working from top to bottom of dc), ch1, 5fpdc into next dc (working from bottom to top of dc), * sk ch-2, sl.st into next ch1-sp, sk ch-2, 5fpdc into next dc (working from top to bottom of dc), ch1, 5fpdc into next dc (working from bottom to top of dc), rep from * to end, turn

UK-Row 6: 1ch, 5fptr into last tr of previous row, (working from top to bottom of tr), 1ch, 5fptr into next tr (working from bottom to top of tr), * miss 2ch, sl.st into next 1ch.sp, miss 2ch, 5fptr into next tr (working from top to bottom of tr), 1ch, 5fptr into next tr (working from bottom to top of tr), rep from * to end, turn

So for each scale you see it is actually 2 rows, you build the structure then add the scales on top

Basically all crocodile sts are the same it can just be the under structure that varies

We do hope this has helped 🙂

Until next time

Fiona & Shirley x

Free Baby Hat & Mittens Pattern

Free Baby Hat & Mittens Pattern

Posted by Fiona on 2nd Feb 2018

Get PDF Pattern on Craftsy

You can get the PDF pattern here

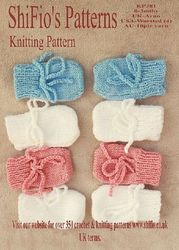
There comes a morning every autumn where you realise half way to school that mittens and hats should have been worn. I made this plain, easy and quick beanie and mitten pattern on that day, I had it ready for school pick up- look at that cheeky face x


Preemie~ Circumference 13” (33cm) Height 4.5” (11cm)

0-3 months~ Circumference 14” (35cm) Height 5” (13cm)

3-6 months ~ Circumference 16” (40cm) Height 6.5” (16.5cm)

REQUIREMENTS

UK DK, AU 8ply yarn, USA Light worsted (3)

20g,  20g,   25g

Crochet hook UK 4mm, USA F


UK Terminology (USA below)

Tension – Using yarn and hook from above, 9tr x 4 ½ rows to 2” (5cm)

Abbreviations: ch-chain, dc-double crochet, tr-treble, rep- repeat, beg –beginning

Beanie

Make 4ch, sl.st to form ring

Rnd 1: 3ch, 11tr into ring, sl.st into top of beg dc (12sts)

Rnd 2: 3ch, 1tr into base of 3ch, 2tr into each st to end sl.st into top of beg 3ch (24sts)

Rnd 3: 3ch, 1tr into base of 3ch, 1tr into next st, * 2tr into next st, 1tr into next st, rep from * to end, sl.st into top of beg 3ch (36sts)

Rnd 4: 3ch, 1tr into base of 3ch, 1tr into next 2sts, * 2tr into next st, 1tr into next 2sts, rep from * to end, sl.st into top of beg 3ch (48sts) preemie stops here

Rnd 5: 3ch, 1tr into base of 3ch, 1tr into next 3sts, * 2tr into next st, 1tr into next 3sts, rep from * to end, sl.st into top of beg 3ch (60sts) 0-3 mths stops here

Rnd 6: 3ch, 1tr into base of 3ch, 1tr into next 4sts, * 2tr into next st, 1tr into next 4sts, rep from * to end, sl.st into top of beg 3ch (72sts) 3-6 mths stops here

All sizes

Next rnd: 3ch, 1tr into each st to end, sl.st into top of beg 3ch

Rep last rnd (7, 8, 9)

Break yarn, sew in threads

Mittens- make 2

Make 24, 26, 28ch, sl.st into to first ch to join

Rnd 1-4, 1-5, 1-6: 3ch, 1tr into each ch to end, sl.st into top of beg 3ch

Cord Rnd: 4ch, miss 1st, * 1tr into next st, miss 1st, rep from * to end, sl.st into 3rdof beg 4ch

Next Rnd: 3ch,1tr in each st and ch.sp to end, sl.st into top of beg 3ch

Next 4 Rnds: 3ch,1tr into each st to end, sl.st into top of beg 3ch

Break yarn

Cords

Make 88ch

Row 1: 1dc into second ch from hook and each ch to end

Break yarn

Make up

Sew in ends, sew top of the mitten together insert cord in row


USA Terminology 

Gauge– Using yarn and hook from above, 9dc x 4 ½ rows to 2” (5cm)

Abbreviations: ch-chain, sc-single crochet, dc-double crochet, rep- repeat, beg –beginning

Beanie

Ch4, sl.st to form ring

Rnd 1: ch3, 11dc into ring, sl.st into top of beg sc (12sts)

Rnd 2: ch3, 1dc into base of ch-3, 2dc into each st to end sl.st into top of beg ch-3 (24sts)

Rnd 3: ch3, 1dc into base of ch-3, 1dc into next st, * 2dc into next st, 1dc into next st, rep from * to end, sl.st into top of beg ch-3 (36sts)

Rnd 4: ch3, 1dc into base of ch-3, 1dc into next 2sts, * 2dc into next st, 1dc into next 2sts, rep from * to end, sl.st into top of beg ch-3 (48sts) preemie stops here

Rnd 5: ch3, 1dc into base of ch-3, 1dc into next 3sts, * 2dc into next st, 1dc into next 3sts, rep from * to end, sl.st into top of beg ch-3 (60sts) 0-3 mths stops here

Rnd 6: ch3, 1dc into base of ch-3, 1dc into next 4sts, * 2dc into next st, 1dc into next 4sts, rep from * to end, sl.st into top of beg ch-3 (72sts) 3-6 mths stops here

All sizes

Next rnd: ch3, 1dc into each st to end, sl.st into top of beg ch-3

Rep last rnd (7, 8, 9)

Break yarn, sew in threads

Mittens- make 2

Ch24, 26, 28, sl.st into to first ch to join

Rnd 1-4, 1-5, 1-6: ch3, 1dc into each ch to end, sl.st into top of beg ch-3

Cord Rnd: 4ch, sk1st, * 1dc into next st, sk 1st, rep from * to end, sl.st into 3rd of beg ch-4

Next Rnd: ch3,1dc in each st and ch.sp to end, sl.st into top of beg ch-3

Next 4 Rnds: ch3,1dc into each st to end, sl.st into top of beg ch-3

Fasten off

Cords

Ch88

Row 1: 1sc into second ch from hook and each ch to end

Fasten off

Make up

Sew in ends, sew top of the mitten together insert cord in row

*there is an affiliate link on this page